
Expert tips to facilitate model building.
Quick Adding of Blocks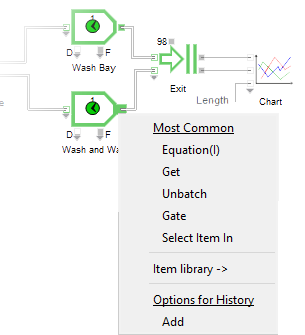 To add a block in parallel, right-click on a block's input or output connector. The popup menu shows common blocks that typically precede or follow the given block plus quick access to the library from which you should choose a block. To add a block in parallel, right-click on a block's input or output connector. The popup menu shows common blocks that typically precede or follow the given block plus quick access to the library from which you should choose a block. |
Insert a Block Between Connected Blocks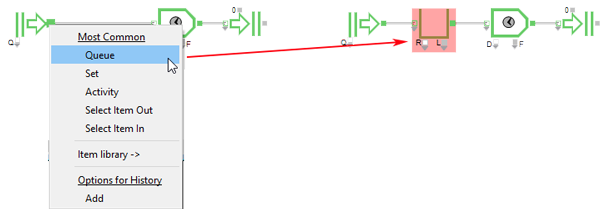 Move the two blocks apart to provide room for the new block. Then right-click on the output connector of the first block and choose the block to insert. Move the two blocks apart to provide room for the new block. Then right-click on the output connector of the first block and choose the block to insert. |
Comparing Results for a Model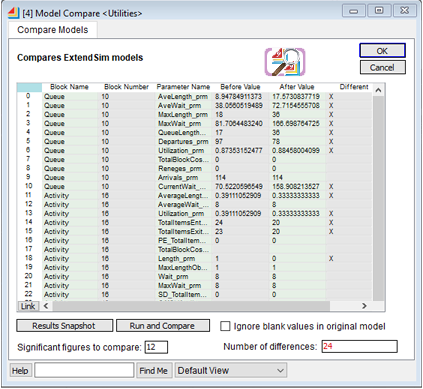 ExtendSim includes an automated test environment for model verification and testing. For example, you might want to make a change to a saved model and run it before saving again to see if the results changed. ExtendSim includes an automated test environment for model verification and testing. For example, you might want to make a change to a saved model and run it before saving again to see if the results changed.To do this:
To save these changes, you must first delete the Model Compare block, then Save the model. Simply closing the model will discard your changes along with the Model Compare block. |
| Link Alerts Live update messages, called Link Alerts, are sent between ExtendSim blocks and the ExtendSim databases or global arrays they are dynamically linked to. This means that as soon as the data at the source changes, an alert will be dynamically sent to all the blocks linked to that location, and those target blocks can take actions to react to the new value. For example, if you write to a location in an ExtendSim database, ExtendSim will send update messages to all the Read blocks in the model linked to that location. When the Read block receives the alert message, it will act on the fact that the data value changed. Writing to a cell in an Excel spreadsheet or to a text file will not have the same live link effect. Be careful though, Link Alerts can significantly slow simulation speed if enabled during the simulation run. For the most part, Link Alerts make the blocks that have implemented them work as expected—when data changes, the blocks will respond appropriately. However, due to all the opportunities for response, Link Alerts are an especially powerful tool when using equation-based blocks or creating custom blocks. If you are developing a block that needs to respond to changes in data (ExtendSim database or global or dynamic arrays) or you are creating sophisticated equations that need this, or you need to use the Link Alert block, see the ExtendSim Technical Reference to understand more about how Link Alerts work. |
| Sending a Model to Someone Else If you send your model to someone else to run, don’t forget to include all necessary files. Your model might not include all the files in this list, but if it does, then you will need to include it. The list includes the following:
|
| Making a Backup of Your Model Make a backup of your model from time to time. This is useful if you want to go back and open a previous model version. In order to do that, periodically make a complete backup of your model and any additional files it might need. You might not be able to run an old model if you don’t. The complete archived model should include the same elements you would need to include if you sent the model to someone else to run. Every model might not have all of these elements, but if they do, store them with that current version of the model. The list is as follows:
The same concept applies to all the other files listed above. If we don't include them in the model backup, when we go and open up the backup model it may or may not work properly if there have been changes to the library files, include files, pictures, or data files. These files can change over time as you enhance your model so it would be a great idea to keep a copy of these files with the model backup. You could use WinZip to make a complete backup of all the required files, but other tools could be used as well. If you are working with a group of model developers and everyone is working on the same model, something more advanced should be used which allows each user to check in changes on each individual file. Source control tools can be used here, but you would not be able to see the differences between versions like you would with raw source code. The source control tools work well for keeping track of changes if the users document changes appropriately. Another good tool for managing ExtendSim projects with multiple developers is Basecamp. |
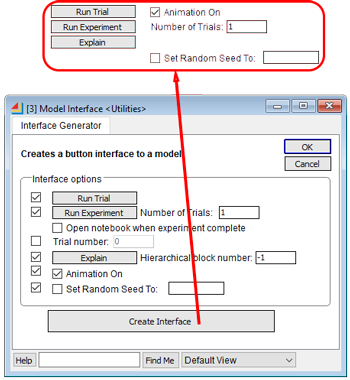 Adding a Button Interface to your Model Adding a Button Interface to your ModelQuickly and easily add multiple shortcuts for model runs by using the Model Interface (Utilities library) block. From the dialog of Model Interface, simply select the shortcuts you want to appear, then click Create Interface. Clones of the options selected will automatically appear on the model worksheet. Options include:
|
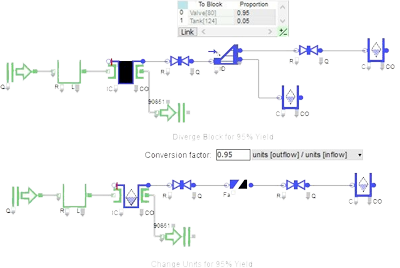 Alternative Methods to Model Yield or Product Loss Alternative Methods to Model Yield or Product LossModeling yield or product loss in a rate-based model is a common requirement. One method to model this is to use a Diverge (Rate library) block that sends a percentage of flow to a Tank (Rate library) block. However, the Diverge block requires a relatively complex calculation that is done every time there is a rate change and a Tank is required to store the disposed material. This might become cumbersome if rate attributes are used as the Tank needs to track increasing layers of attributes (You can set the rate attributes to 0 to help with this, but it does require adding a set blocks.) A simpler and faster solution would be to use a Change Units (Rate library) block that reduces the rate in one step. |